

Creating an extension app
This page outlines the steps involved in creating a custom app. It walks you through the technical step and explores the capabilities custom apps provide to tailor frePPLe to your business needs.
Prerequisites
You will need to be familiar with the Python programming language to complete this tutorial.
Knowledge of HTML and SQL is also needed to fully understand how your app works within the frePPLe framework.
In this tutorial we’ll be using a docker container to package and deploy your customized version of frePPLe. While there are other methods to install and deploy, we highly recommend using a container: it’s the maintable, clean and modern way to manage your application.
Download the tutorial app
An app is structured as a Python module that needs to follow a specific structure. You can create a skeleton structure for your app by unzipping this file. and place its contents under the freppledb folder.
Download zip-file with sample extension
dockerfile
my-app
   |- __init__.py
   |- models.py
   |- attributes.py
   |- migrations
   |   |- __init__.py
   |   |- 0001-initial.py
   |   |- 0002-attributes.py
   |- admin.py
   |- serializers.py
   |- views.py
   |- urls.py
   |- menu.py
   |- commands.py
   |- fixtures
   |   |- my_app_data.json
   |- tests.py
   |- management
       |- __init__.py
       |- commands
           |- __init__.py
           |- mycommand.py
Register your app
In the file djangosettings.py your new app needs to be added in the section INSTALLED_APPS.
The ordering of the apps is important - apps higher in the list can override functionality of apps lower in the list. Insert your app at the location indicated in the file.
INSTALLED_APPS = (
    "django.contrib.auth",
    "django.contrib.contenttypes",
    "django.contrib.messages",
    "django.contrib.staticfiles",
    "freppledb.boot",
    # Add any project specific apps here
    "myapp",  # <<<< HERE'S OUR APP
    # "freppledb.odoo",
    # "freppledb.erpconnection",
    "freppledb.input",
    "freppledb.output",
    "freppledb.metrics",
    "freppledb.execute",
    "freppledb.common",
    "django_filters",
    "rest_framework",
    "django.contrib.admin",
    # The next two apps allow users to run their own SQL statements on
    # the database, using the SQL_ROLE configured above.
    "freppledb.reportmanager",
    # "freppledb.executesql",
)
Run your docker container
It’s time to start your customized container a first time.
After every edit in the app you’ll need to rebuild your custom image and container. Don’t worry, it lasts only a few seconds and you don’t loose the data from the database.
docker build my_frepple -t -my_frepple

docker run \
  -e POSTGRES_HOST=host.docker.internal \
  -e POSTGRES_PORT=5432 \
  -e POSTGRES_USER=frepple \
  -e POSTGRES_PASSWORD=frepple \
  -e POSTGRES_DBNAME=freppledb \
  --restart always \
  --name my_frepple \
  --publish 9000:80 \
  --detach \
  my_frepple
If all went well you can access frepple with your browser now on http://localhost:9000.
Extend existing models with new fields
The file attributes.py defines new fields that extend the standard data model. For instance, pretty much every implementation has some specific item characteristics which the planner would like to see.
...
registerAttribute(
    "freppledb.input.models.Item",  # Class we are extending
    [
        (
            "attribute_1",  # Field name in the database
            _("first attribute"),  # Human readable label of the field
            "number",  # Type of the field.
            True,  # Is the field editable?
            True,  # Should the field be visible by default?
        )
    ],
)
...
This file only declares the model structure. The actual database field will be created in a following step.
Define the database models
The file models.py describes new database models. It defines the database tables, their fields and indexes.
class My_Model(AuditModel):
    # Database fields
    name = models.CharField(_("name"), primary_key=True)
    charfield = models.CharField(
        _("charfield"),
        null=True,
        blank=True,
        help_text=_("A sample character field"),
    )
    booleanfield = models.BooleanField(
        _("booleanfield"),
        blank=True,
        default=True,
        help_text=_("A sample boolean field"),
    )
    decimalfield = models.DecimalField(
        _("decimalfield"),
        max_digits=20,
        decimal_places=8,
        default="0.00",
        help_text=_("A sample decimal field"),
    )

    class Meta(AuditModel.Meta):
        db_table = "my_model"  # Name of the database table
        verbose_name = _("my model")  # A translatable name for the entity
        verbose_name_plural = _("my models")  # Plural name
        ordering = ["name"]
This file only declares the model structure. The actual table will be created in a later step.
You can find all details on models and fields on https://docs.djangoproject.com/en/4.2/ref/models/fields/
Create tables and fields in the database
In the previous steps all models and attributes were defined. The database tables are automatically created in the PostgreSQL database when you start the docker container.
In exceptional situations you can run them manually with the following statement on the command line:
frepplectl migrate
This command will incrementally bring the database schema up to date. The database schema migration allows upgrading between different versions of frePPLe (or your ap) without loss of data and without recreating the database from scratch.
Migration scripts are Python scripts, located in the migrations folder. The scripts are generated mostly automatic with the command line below. More complex migrations will need review and/or coding by developers.
# Generate a skeleton migration script - run by developers only
frepplectl makemigrations my_app
class Migration(AttributeMigration):

    # Module owning the extended model
    extends_app_label = "input"

    # Defines migrations that are prerequisites for this one
    dependencies = [("my_app", "0001_initial")]

    # Defines the migration operation to perform: such as CreateModel, AlterField,
    # DeleteModel, AddIndex, RunSQL, RunPython, etc...
    operations = [
        migrations.AddField(
            model_name="item",
            name="attribute_1",
            field=models.DecimalField(
                blank=True,
                db_index=True,
                decimal_places=8,
                max_digits=20,
                null=True,
                verbose_name="first attribute",
            ),
        )
    ]
You can find all details on migrations on https://docs.djangoproject.com/en/4.2/topics/migrations/
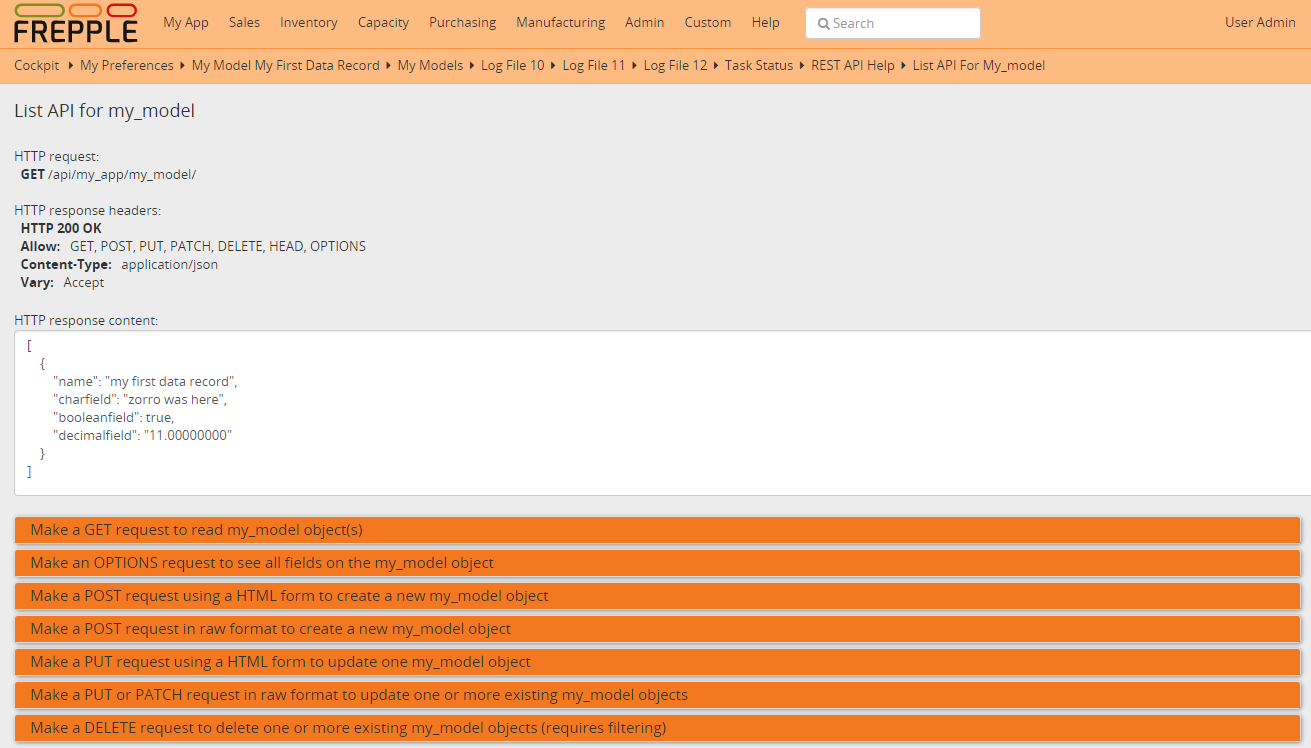
Define a REST API for your models
The file serializers.py defines a REST API for your models. You can explore the REST API from the menu “help/REST API help”.
class MyModelFilter(FilterSet):
    class Meta:
        model = My_Model
        fields = {
            "name": ["exact", "in", "contains"],
            "charfield": ["exact", "contains"],
            "booleanfield": ["exact"],
            "decimalfield": ["exact", "in", "gt", "gte", "lt", "lte"],
            "source": ["exact", "in"],
            "lastmodified": ["exact", "in", "gt", "gte", "lt", "lte"],
        }
        filter_fields = ("name", "charfield", "booleanfield", "decimalfield")


class MyModelSerializer(BulkSerializerMixin, ModelSerializer):
    class Meta:
        model = My_Model
        fields = ("name", "charfield", "booleanfield", "decimalfield")
        list_serializer_class = BulkListSerializer
        update_lookup_field = "name"
        partial = True


class MyModelSerializerAPI(frePPleListCreateAPIView):
    queryset = My_Model.objects.all()
    serializer_class = MyModelSerializer
    filter_class = MyModelFilter
You can find all details on creating REST APIs on https://www.django-rest-framework.org/
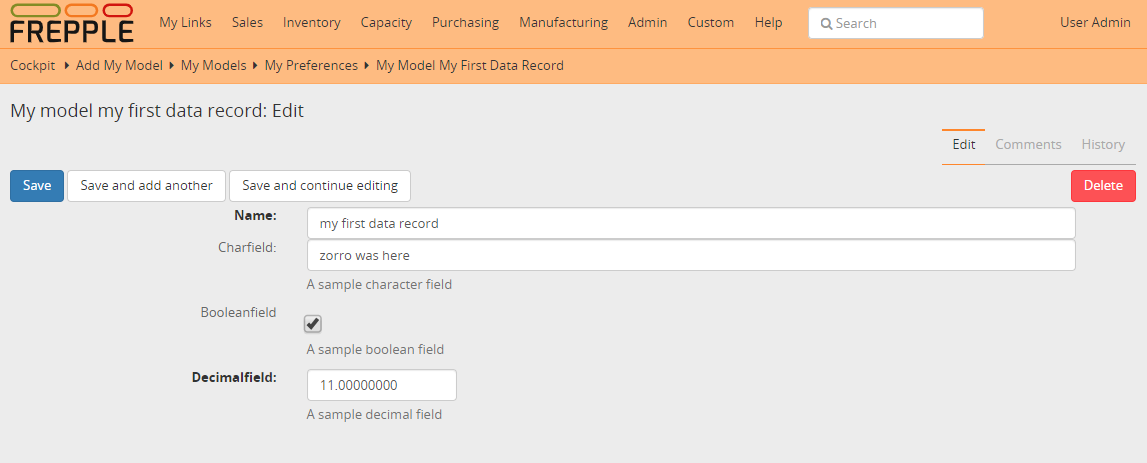
Create editing forms for your models
The file admin.py defines a form to edit objects of your models.
@admin.register(My_Model, site=data_site)
class My_Model_Admin(MultiDBModelAdmin):
    model = My_Model
    fields = ("name", "charfield", "booleanfield", "decimalfield")
    save_on_top = True
    # Defines tabs shown on the edit form
    tabs = [
        {
            "name": "edit",
            "label": _("edit"),
            "view": "admin:my_app_my_model_change",
            "permissions": "my_app.change_my_model",
        },
        {
            "name": "comments",
            "label": _("comments"),
            "view": "admin:my_app_my_model_comment",
        },
        {
            "name": "history",
            "label": _("History"),
            "view": "admin:my_app_my_model_history",
        },
    ]
You can find all details on admin forms on https://docs.djangoproject.com/en/4.2/ref/contrib/admin/
Define new reports
New reports are defined in a file views.py. The classes in this file typically will run SQL statements to retrieve data from the database, apply the correct business logic and return HTML code to the user’s browser.
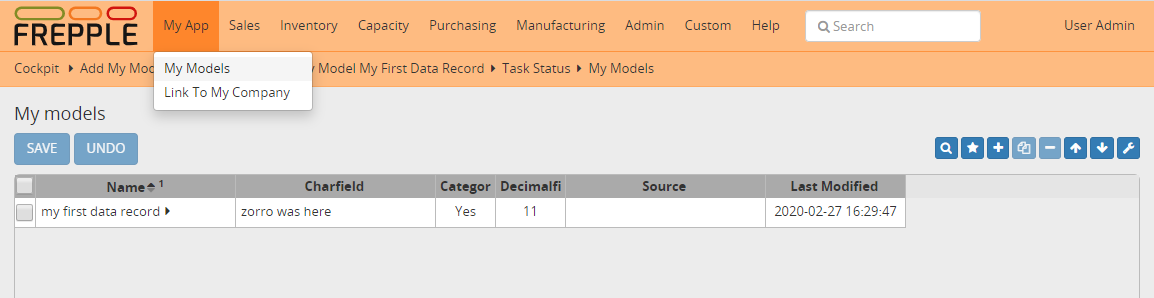
class MyModelList(GridReport):
    """
    This report show an editable grid for your models.
    You can sort data, filter data, import excel files, export excel files.
    """
    title = _("My models")
    basequeryset = My_Model.objects.all()
    model = My_Model
    frozenColumns = 1
    rows = (
        GridFieldText(
            "name",
            title=_("name"),
            key=True,
            formatter="detail",
            extra='"role":"my_app/my_model"',
        ),
        GridFieldText("charfield", title=_("charfield")),
        GridFieldBoolNullable("booleanfield", title=_("category")),
        GridFieldNumber("decimalfield", title=_("decimalfield")),
        GridFieldText("source", title=_("source")),
        GridFieldLastModified("lastmodified"),
    )
More advanced views can also separate the python business logic from the HTML rendering. This example app doesn’t explore this.
See this page for more details on the structure of the report code.
Register the URLs of the new reports
The url where the report is published is defined in the file urls.py.
urlpatterns = [
    # Model list reports, which override standard admin screens
    url(
        r"^data/my_app/my_model/$",
        MyModelList.as_view(),
        name="my_app_my_model_changelist",
    ),
    # URLs for the REST API
    url(r"^api/my_app/my_model/$", MyModelSerializerAPI.as_view()),
]
You can find more detailed information on https://docs.djangoproject.com/en/4.2/topics/http/urls/
Add demo data
In the subfolder fixtures you can define demo datasets that can be loaded with the command “frepplectl loaddata” or interactively in the execution screen.
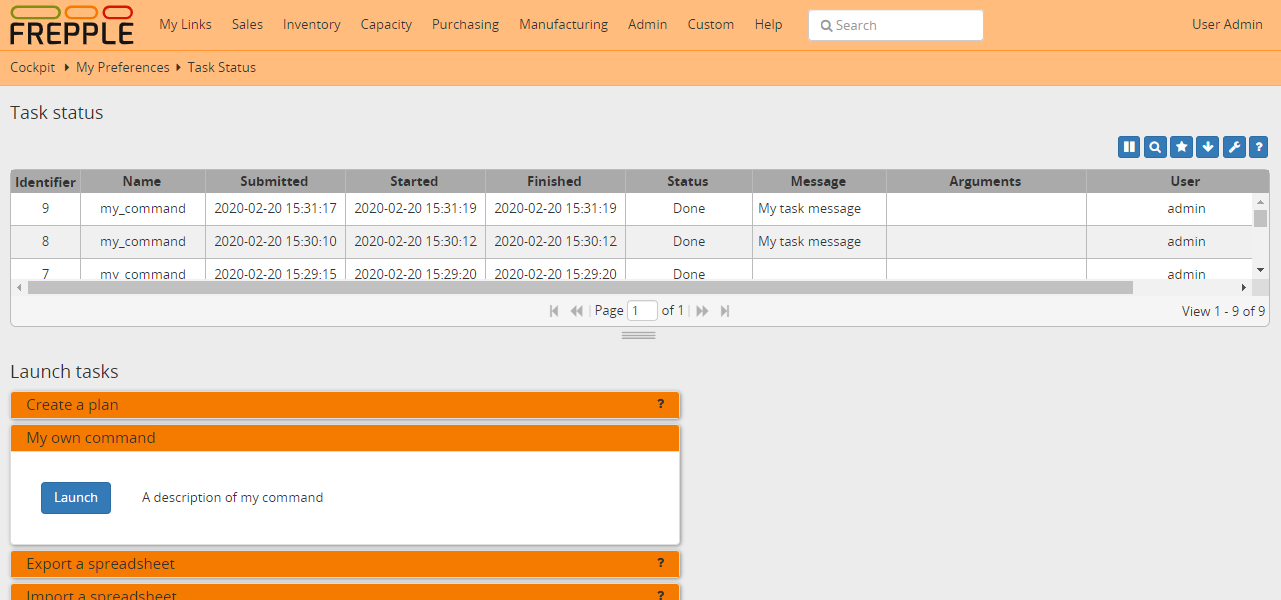
Fixtures are text files in JSON format. They can be loaded from the command line, from the execution screen (see the “my_app_data” entry in the screenshot below) or through a web API.
[
{"model": "my_app.my_model", "fields": {"name": "sample #1", "charfield": "A", "booleanfield": true, "decimalfield": 999.0}},
{"model": "my_app.my_model", "fields": {"name": "sample #2", "charfield": "B", "booleanfield": false, "decimalfield": 666.0}}
]

You can find more detailed information on https://docs.djangoproject.com/en/4.2/howto/initial-data/
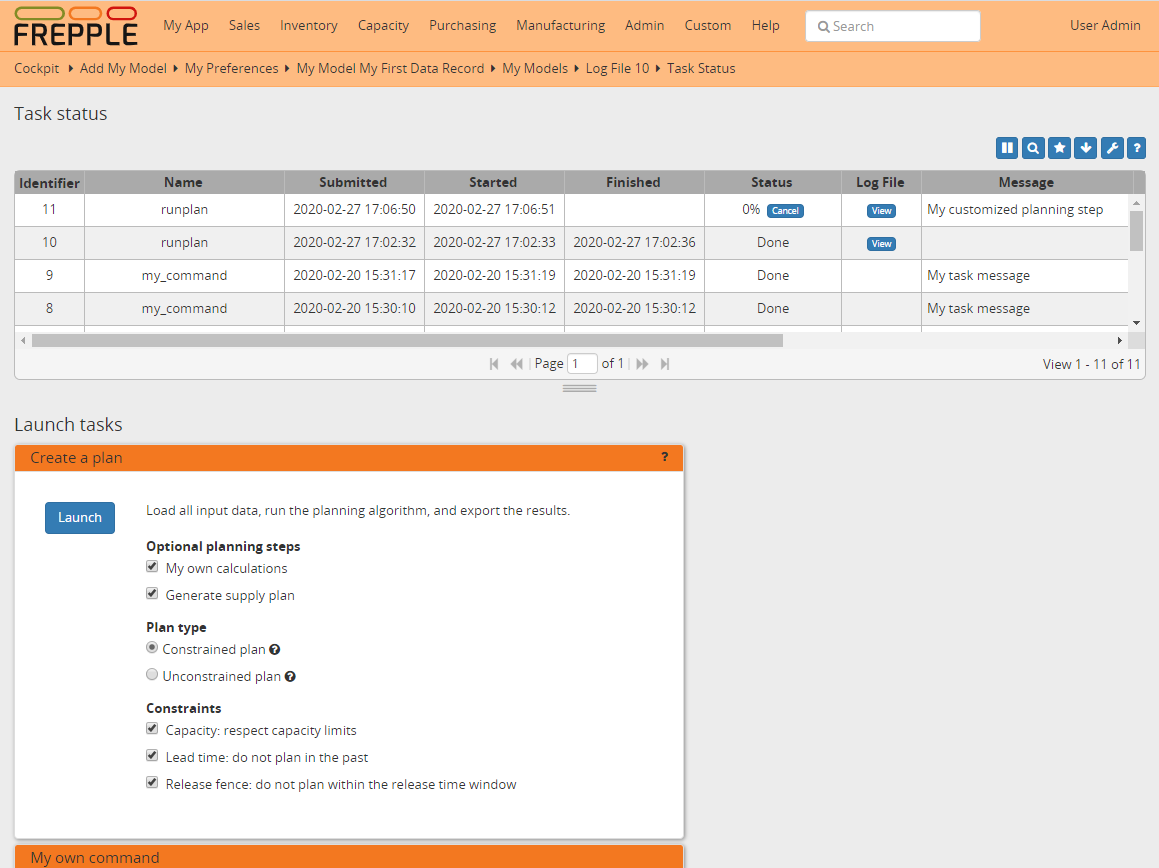
Customize the plan generation
The script commands.py is used to customize the plan generation. You can add extra pre- or post-processing steps, and you can also make the execution of t.
@PlanTaskRegistry.register
class MyCalculation(PlanTask):
    description = "My customized planning step"

    # Defines when the task should be executed
    sequence = 51

    label = ("myapp", _("My own calculations"))

    @classmethod
    def getWeight(cls, database=DEFAULT_DB_ALIAS, **kwargs):
        if "myapp" in os.environ:
            # Defines the relative duration of this task.
            return 1
        else:
            # Skip this step
            return -1

    @classmethod
    def run(cls, database=DEFAULT_DB_ALIAS, **kwargs):
        print("Starting incredibly complex calculation")
        time.sleep(20)
        print("Finished incredibly complex calculation")
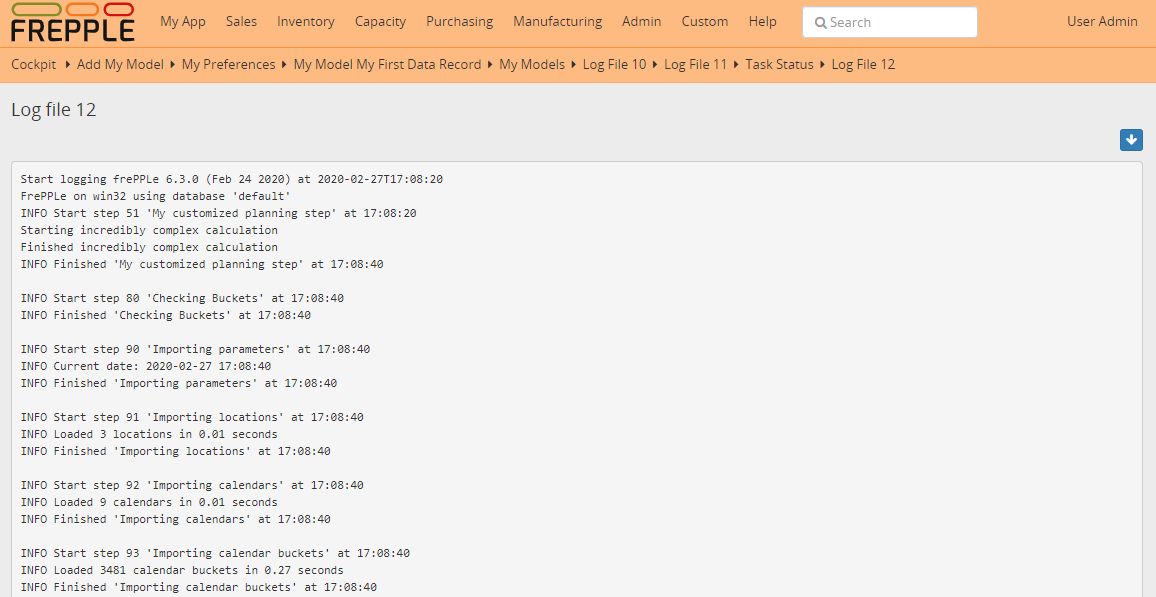
The screenshots below show a) a checkbox where the user can choose whether or not to perform the extra logic, b) a custom message when our step is executing, and c) prints from our custom calculations in the plan generation log file.
Add custom administration commands
Files in the folder management/commands define extra commands. You can execute the custom commands from the command line, through a web API or interactively from the execution screen.
# Run from the command line
frepplectl my_command
# Web API of the command
POST /execute/api/my_command/
Simplified, the code for a command looks as follows:
class Command(BaseCommand):
    # Help text shown when you run "frepplectl help my_command"
    help = "This command does ..."

    # Define optional and required arguments
    def add_arguments(self, parser):
        parser.add_argument(
            "--my_arg",
            dest="my_arg",
            type=int,
            default=0,
            help="an optional argument for the command",
        )

    # The busisness logic of the command goes in this method
    def handle(self, *args, **options):
        print("This command was called with argument %s" % options["my_arg"])

    # Label to display on the execution screen
    title = _("My own command")

    # Sequence of the command on the execution screen
    index = 1

    # This method generates the text to display on the execution screen
    @staticmethod
    def getHTML(request):
        context = RequestContext(request)
        template = Template(
            """
            {% load i18n %}
            <form class="form" role="form" method="post"
               action="{{request.prefix}}/execute/launch/my_command/">{% csrf_token %}
            <table>
            <tr>
              <td style="padding:15px; vertical-align:top">
              <button  class="btn btn-primary" id="load" type="submit">{% trans "launch"|capfirst %}</button>
              </td>
              <td style="padding:15px">
              A description of my command
              </td>
            </tr>
            </table>
            </form>
            """
        )
        return template.render(context)
You can find more detailed information on https://docs.djangoproject.com/en/4.2/howto/custom-management-commands/
Add unit tests
Unit tests are defined in the file tests.py. They are executed when you run the command:
# Run the test
frepplectl test freppledb.my_app
The code for a unit test looks as follows:
class SimpleTest(TestCase):
  def test_basic_addition(self):
      self.assertEqual(1 + 1, 2)    # Just making sure
You can find more detailed information on https://docs.djangoproject.com/en/4.2/topics/testing/overview/
Even more information!
FrePPLe is based on django web application framework. You can dig deeper by visiting https://www.djangoproject.com, checking out the full documentation and follow a tutorial.
Another good approach is to study the way the standard apps in frePPLe are structured. The full source code of the Community Edition is on https://github.com/frePPLe/frepple/tree/master/freppledb